Week 13-15 — Final Project
Objective
The objective of this project is to control the UR3e to move (at least) three AR-tagged blocks to desired positions using the camera image as input. We will use OpenCV for processing the image data. The program will also integrate the functions of previous lab assignments (camera calibration, perspective transforms, FK/IK, and ROS nodes). The major objectives are the following - Use OpenCV functions to find the centroid of each block - Convert the pixel coordinates in an image to coordinates in the world frame using a perspective matrix - Move the blocks from the detected positions to predefined desired positions (e.g. out of the workspace, stack a tower)
Task Description
The lab environment is shown below:
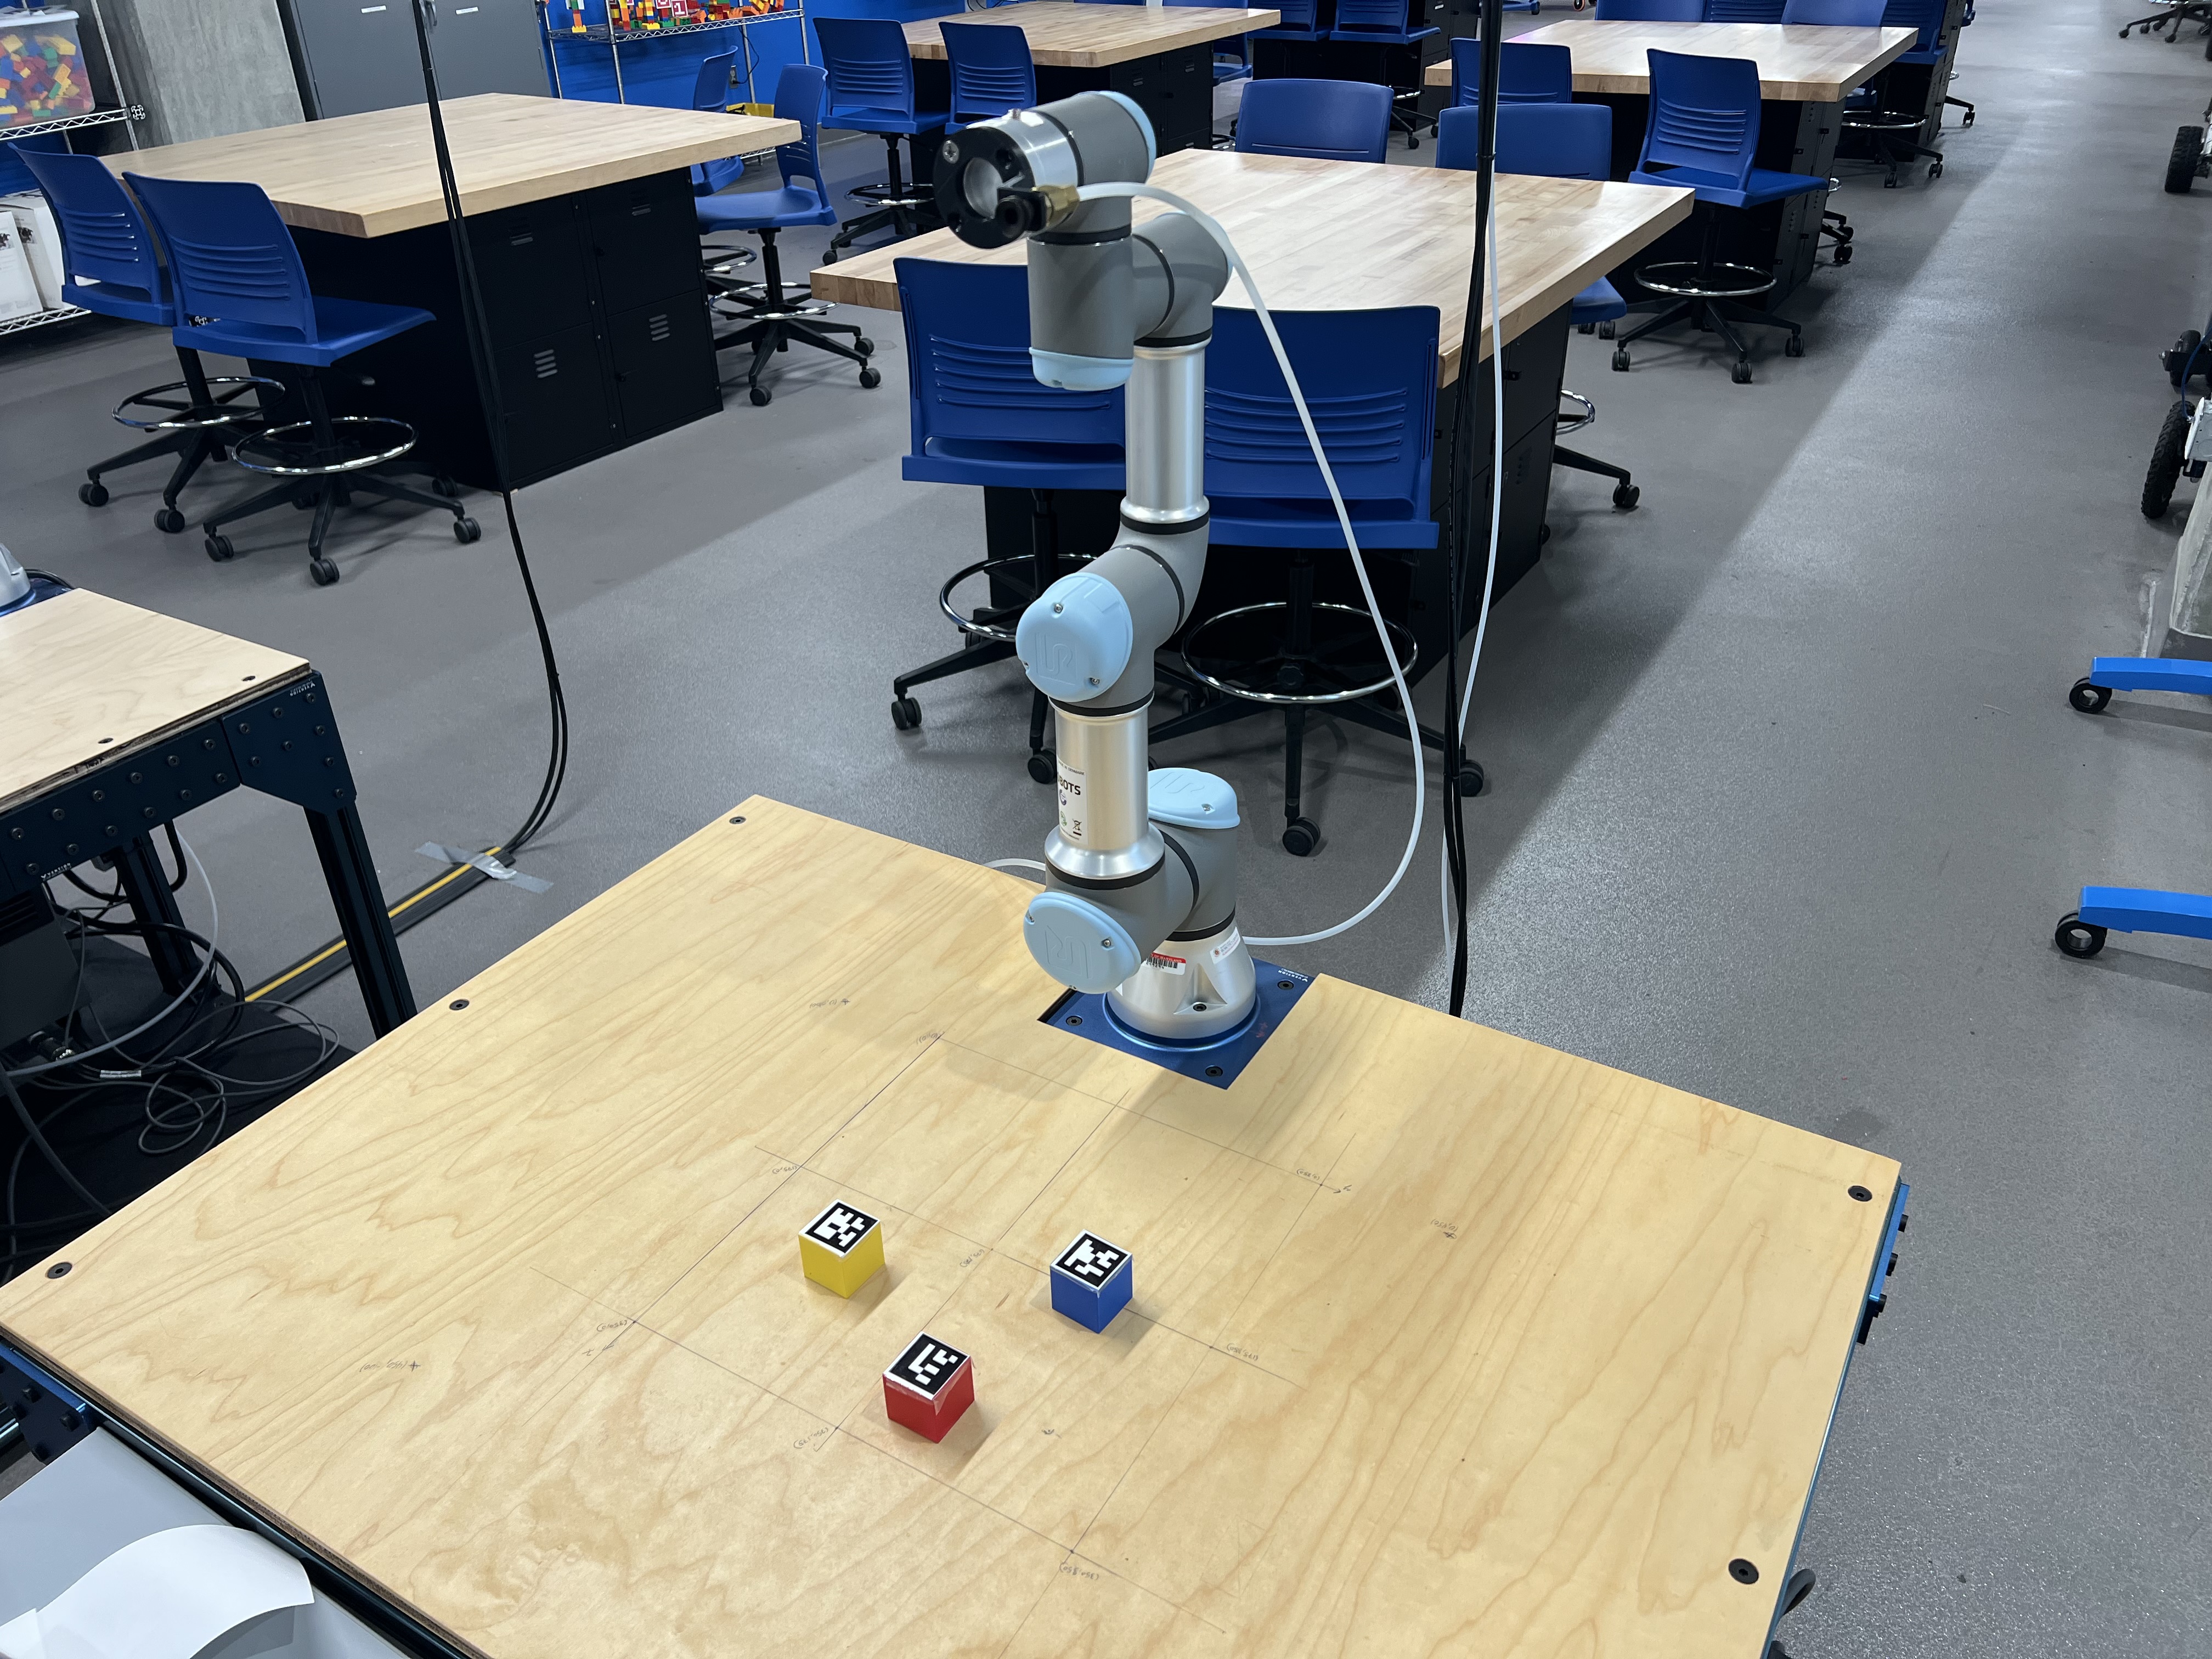
You will be given 3 blocks with different Aruco markers. Your task is to move them out of the workspace into predefined positions. To do so, you will need to find the centroid position of the top side of each block with an image from the camera mounted above the table, facing down on the workspace. You will convert the detected pixel coordinates to the table frame using a perspective transform. Then, using your inverse kinematics solution, you will pick up the block using a suction gripper mounted at the end effector. Your task is to place each block at a specific location outside the workspace, and also stack them to create a tower.
Overview of the ROS Package
The project package should be located on the local lab machines in RAL. You can also find the package with redacted scripts here: https://github.com/ENME480/enme480_project.
The nodes have been added to the setup.py file, so you do not need to add that. You will find five scripts as listed in the table below:
| Script Name | Description |
|---|---|
get_perspective_warping_with_aruco.py |
Script to create the perspective matrix |
perspective_gazebo.py |
Script to create the perspective matrix in Gazebo |
aruco_detection_test.py |
Script to test the perspective transform and get coordinates of the blocks in table frame |
block_detection_aruco.py |
ROS Node for detecting blocks, uses the same function and changes from aruco_detection_test.py |
kinematic_functions.py |
Script to insert all of your FK and IK functions from previous labs |
main_pipeline.py |
The main pipeline to strategize and sequence movement of the blocks |
Please do not edit anything outside the given code snippets (it will lead to errors which will be difficult to identify)
You can try out the code in simulation before coming to the lab to check if your logic works.
Script Descriptions
You are recommended to complete each script in the order suggested in the table. A typical workflow is:
- Use
get_perspective_warping_with_aruco.pyto generate the perspective matrix. - Use
aruco_detection_test.pyto verify ArUco detection and coordinate conversion on a simple script. - Copy your working detection code into
block_detection_aruco.pyto create a ROS node. - Copy your FK/IK from previous labs into
kinematic_functions.py. - Use
main_pipeline.pyto design and test your full pick-and-place strategy.
get_perspective_warping_with_aruco.py
This script will generate a perspective matrix for the camera-to-table frame. You need to edit one line to input the reference points on the table. Ensure that you are entering the values in mm. This script will generate a perspective_matrix.npy file in the folder, which will be used later by the detection scripts.
aruco_detection_test.py
This script will give you a live detection of the ArUco markers and their location with respect to the table frame in real time. You need to modify the image_frame_to_table_frame() function in the script. Use the math from perspective transforms to do the same. You can find a file discussing perspective transforms in the main folder of this repository.
block_detection_aruco.py
This is the ROS node and a Python class for all the functions in the aruco_detection_test.py script. If your aruco_detection_test.py could detect the block coordinates correctly, please copy the same function to the snippet for image_frame_to_table_frame() function in this script as well.
kinematic_functions.py
This script will use your functions from previous labs, and if you have the script working correctly for your FK and IK labs, you can copy the exact same functions here under calculate_dh_transform() and inverse_kinematics() within the given snippets. We need to verify if your IK script is working correctly, so please call the TAs over to show your final IK code working before you copy this.
main_pipeline.py
This script is where you will sequence and strategize the pick-and-place process. In this script, you have to edit the following functions:
-
move_arm()This function will take in the desired joint positions and publish them using the message data structure given in the code comments. It should only command arm motion (not change the gripper state).
-
gripper_control()This function will take in the desired state of the gripper and publish it using the message data structure given in the code comments. It should toggle the gripper while holding the current arm configuration.
-
move_block()Here, you need to work on giving the sequence of positions you want the block to move to for moving a block from an initial position to a final position. Keep in mind that every block needs to be picked up, raised, and then moved. Do not give it a sequence that drags the block across the table.
-
process_blocks()This function is where you will enter the strategy and sorting method to place the blocks in their desired positions given their IDs and predefined destinations. This is also where you decide how many stacks you make and in what order you move the blocks.
Running your Scripts
Procedure for Setup using Gazebo
The repository has been updated to include updated simulation tools and helper scripts so you'll need to pull the latest version
Before doing that, take a backup of your current /src folder so that you don't accidentally lose access to your previous work.
Next, we pull the latest version of the repository
Next, we pull the latest version of the helper package repository (project starter code):
Step 2: Build and run docker
For MacOS/VM users, change Line no. 4 in the docker file humble-enme480_ur3e.Dockerfile at ~/ENME480_mrc/docker
# BEFORE
FROM osrf/ros:humble-desktop AS humble-mod_desktop

# AFTER
FROM arm64v8/ros:humble AS humble-mod_desktop
Do not do this on anything other than a MAC! MACs require code that has been compiled in a special way in order to work and this code does not work on other computers!
For Everyone, run
cd ~/ENME480_mrc/docker/
userid=$(id -u) groupid=$(id -g) docker compose -f humble-enme480_ur3e-compose.yml build
Create the startDocker.sh and connectToDocker.sh scripts again if you haven't yet
For people not using the Nvidia container, run:
cd

echo -e "#"'!'"/bin/bash\nexport userid=$(id -u) groupid=$(id -g)\ncd ~/ENME480_mrc/docker\ndocker compose -f humble-enme480_ur3e-compose.yml run --rm enme480_ur3e-docker" > startDocker.sh

echo -e "#"'!'"/bin/bash\ncontainer="'$(docker ps | grep docker-enme480_ur3e-docker-run | cut -b 1-12)'"\necho Found running container "'$container'". Connecting...\ndocker exec -ti "'$container'" bash" > connectToDocker.sh
For people who are using the Nvidia container, run:
cd

echo -e "#"'!'"/bin/bash\nexport userid=$(id -u) groupid=$(id -g)\ncd ~/ENME480_mrc/docker\ndocker compose -f humble-enme480_ur3e-nvidia-compose.yml run --rm enme480_ur3e-docker" > startDocker.sh

echo -e "#"'!'"/bin/bash\ncontainer="'$(docker ps | grep docker-enme480_ur3e-docker-run | cut -b 1-12)'"\necho Found running container "'$container'". Connecting...\ndocker exec -ti "'$container'" bash" > connectToDocker.sh
To start the docker container, run
To connect to the same docker container from another terminal, run
Step 3: Build the workspace
Once in the docker container, we build the workspace for the simulation
--symlink-install speeds Python iteration by avoiding rebuilds for script-only changes.
Once done, source it
Step 4: Complete the scripts
You need to complete the following scripts:
block_detection_aruco.pymain_pipeline.pykinematic_functions.py
Step 5: Run the programs
- You can use
tmuxto manage multiple panes. Create panes to work as needed: tmux# Start a new sessionCtrl+A b# Split horizontally-
Ctrl+A v# Split vertically -
Terminal/Pane 1: Launch MRC UR3e Gazebo simulation in one of the
tmuxpanes: -
Terminal/Pane 2: Launch MRC UR3e sim control package in a different
tmuxpane: -
Terminal/Pane 3: Run the perspective matrix calculator for Gazebo in a different
tmuxpane:Click the points on the edge of the table in a clockwise order starting from the left-bottom corner. Press
qwhen you see the blue dot near the middle cube in a separate window. -
Terminal/Pane 3: Once your
main_pipelineandblock_detection_arucoscripts are completed, you can use the sametmuxpane to test your script:
Procedure for Setup in RAL
- Update the repository to be on the latest commit
- Repeat for the ur3e_enme480 repository
If folder does not exist,
else:
- Start the container (run the command from the
dockerfolder): - Once inside the container, build your development workspace:
- Source your development workspace:
- Use
tmuxto manage multiple panes. Create 4 panes to work with an UR3e arm: tmux# Start a new sessionCtrl+A b# Split horizontallyCtrl+A v# Split vertically- Launch the UR3e driver in one of the tmux panes:
- On the teaching pendant start the program that allows ROS2 communication:
Programs-->URCaps-->External Control-->Control_by_MRC_ur3e_pc - Launch MRC UR3e package in a different
tmuxpane: - Launch your node to move the arm / run your program in another
tmuxpane:ros2 run {your node name}orros2 launch {your launch file}
Run the perspective warping code to get a new matrix for your table. Press q when you get a blue dot at (175,175) in a separate window.
Testing the block_detection_aruco node. You can visualize the marker positions in rviz once you run this script.
- In a new terminal in the docker container, launch the camera node:
Troubleshooting:
If you get a Pydantic error run the following command
Once the camera node is up and running, run the following command in a seperate terminal:
It will publish data under two topics /aruco_detection/image and /aruco_detection/positions
You can view the image using
and it should show the same image in the window as the one you saw with aruco_detection_test.py, once you select the topic.
Running the camera node
Running the main_pipeline (Call TAs before you run this)
Submission Requirements
Please submit one single PDF containing the following:
- Pseudo code (and optionally flowchart) for detecting and moving the block (no specific format needed)
- Do not provide the Python code here, only Pseudo code is needed - What is a pseudo code?
- Pseudo code is needed for the entire project, ie. the entire workflow starting from calibrating camera to detecting blocks to moving the blocks
- Math for camera frame to table frame (your intuition behind the perspective warping, and transformation from camera frame to image frame)
- Video of pick and place task on UR3e (as a link (GDrive/YouTube) in the report)
Note: Running the simulation isn't necessary for the final project. It is just given on the Wiki to aid you in trying out your logic.